This page is not compatible with Internet Explorer.
For security reasons, we recommend that you use an up-to-date browser, such as Microsoft Edge, Google Chrome, Safari, or Mozilla Firefox.
Industrial Application Examples
Volume Graphics Software in Use
What Volume Graphics Software Can Do for Your Company
Like many of our customers, you too can save time and money by using industrial CT. This highly precise, non-destructive technology looks inside your products and finds defects that would otherwise remain hidden when using other inspection methods.
However, industrial CT can only unfold its full potential when combined with the right software. Volume Graphics software is your key to unlocking this potential.
Customers use our software on objects small and large, simple and complex. It works on parts made of metal, plastic, and composite materials – or all of them together. If it can be scanned, it can be analyzed and visualized with our software.

VGSTUDIO MAX color codes the windings of the coil according to their direction
"Easier and faster"
Patrick Nikolajko, Global CT & Metrology Manager, Aptiv
"Easier and faster"
Patrick Nikolajko, Global CT & Metrology Manager, Aptiv
"After an initial experience with VGSTUDIO MAX, a colleague who had been working with a coordinate measuring machine for 20 years now only wanted to work with the software because the results were on a par with those of the coordinate measuring machine, but with VGSTUDIO MAX it was easier and faster to get them."
Automotive
Measure Faster with VGSTUDIO MAX
With VGSTUDIO MAX, you can perform 2D and 3D measurement tasks directly on voxel data sets. All you need is the Coordinate Measurement Module. The possibilities go way beyond what can be accomplished when using conventional destructive or other non-destructive inspection methods.
Hirschmann Automotive reduced costs by around 50% after introducing industrial computed tomography (CT) as a measurement tool. The Austrian automotive supplier formerly used optical and tactile inspection methods to measure its parts. Conventional methods were laborious procedures that destroyed the part and only revealed a very small percentage of the part features. Industrial CT provides insight into virtually all features of the part without destroying it – and at lower costs.
With CT and VGSTUDIO MAX, Hirschmann Automotive also significantly reduced the time needed for an initial sample testing procedure, which in turn led to a much shorter time-to-market. Measurements using conventional inspection methods took 450 man-hours for the initial acceptance alone. With the help of CT data and the macro and batch functionality of VGSTUDIO MAX, the same process only took 100 man-hours with only 80 more man-hours needed for final acceptance.

Hirschmann Automotive uses VGSTUDIO MAX to measure its connectors and their 1,200 measurement features
Inspection Time Decreased by 84% with Industrial CT
With VGSTUDIO MAX, you can perform 2D and 3D measurement tasks directly on voxel data sets. All you need is the Coordinate Measurement Module. The possibilities go way beyond what can be accomplished when using conventional destructive or other non-destructive inspection methods.
Automotive supplier Delphi went from inspecting its plastic connectors with slice sectioning to using metrology-based industrial CT – and thereby reduced the time needed for first article inspection from 75 to 12 man-hours while simultaneously improving measuring accuracy.
Each connector has several hundred individual features that need to be inspected. One reason for the significantly faster first article inspection is the use of measuring templates in VGSTUDIO MAX. Macros and batch processing promise to decrease inspection time by a further 50%.
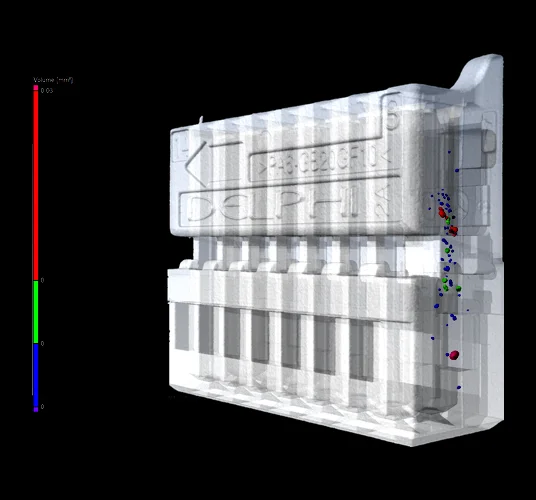
VGSTUDIO MAX is used to inspect several hundred individual features on the connector
Virtually Split an Intact V6 Engine into More Than 150 Components
Volume Graphics software makes it easy to create striking 3D animations for the convincing presentation of results.* Powerful yet easy-to-use segmentation tools in VGSTUDIO MAX help you to disassemble a data set into different components, materials, etc. Better still, clipping features allow you cut open the visualized object for a look inside. And all without harming the object.
The Volkswagen 3.6 liter V6 engine that is shown in the example was mounted and scanned in its entirety on YXLON International's linear accelerator. After the projection data was reconstructed using the VGSTUDIO MAX CT Reconstruction Module, the data set was split virtually into more than 150 components based on their gray values. A video was then created using the resulting data set. All renderings you can see in the video were done on standard PCs using VGSTUDIO MAX.
*Don’t have time to create impressive animations yourself? Let Volume Graphics produce a professional video for you.
See Whether a Piston Has the Correct Measurements at a Glance
With the Wall Thickness Analysis Module for VGSTUDIO MAX, you can determine the wall thickness of objects made of various materials. Automatically localize areas with an insufficient or excessive wall thickness or gap width directly within the voxel, point cloud, mesh or CAD data set.
In this example, a customer measured the wall thickness of a car engine piston. The visualization shows the wall thickness color-coded directly on the surface of the piston. The software also generates a report containing statistical data as well as 2D and 3D images of the critical areas.
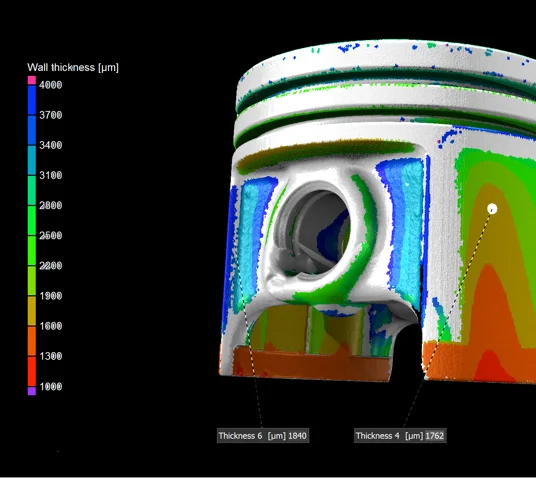
VGSTUDIO MAX shows the wall thickness color-coded directly on the surface of the piston
Easily Compare Parts with Reference Data
The Nominal/Actual Comparison Module for VGSTUDIO MAX makes it possible to directly compare and statistically evaluate two sets of volume data. You can use a CAD model or a second voxel data set for comparison. Deviations are then color-coded directly on the surface of the object. You can also generate a report containing statistical data as well as 2D and 3D images of the critical areas.
In this example, a customer compared an aluminum cast part with the CAD model of that part. After scanning, the Coordinate Measurement Module was used to fit the CT data set to the nominal model, in this case a CAD model. The nominal-actual comparison was then used to determine oversize and undersize across the entire surface. The video shows the color-coded results of the analysis. With this technique, it quickly becomes obvious which areas are within the specifications and which are not.
Also shown in the video: analyses performed with the Porosity/Inclusion Analysis Module and the Coordinate Measurement Module.
Create Impressive Visualizations of the Individual Components of a Robot
With the segmentation tools in VGSTUDIO MAX, you can non-destructively disassemble a data set into its individual parts. Afterwards, you can do things that wouldn’t be possible after a manual disassembly.
In this example, an industrial robot manufactured by KUKA was scanned, segmented, and photo-realistically colorized. An explosion animation was used to strikingly present the segmented parts.
Use CAD Data to Easily Identify the Individual Components of a Car Key
Use the segmentation tools in VGSTUDIO MAX to separate a data set into individual parts. This even works easily and precisely on multi-material objects when you use a CAD model as a starting contour for a (local) adaptive surface determination.
In this example, a customer virtually disassembled a scanned car key. Although the conditions for a quick segmentation were not met because some of its components are plastic and hence have similar gray values, the segmentation of the car key was still an effortless process. How? A CAD model helped the software determine the surface of different components. An explosion animation was used to better present the segmented parts.
Identify Problems in Castings before Machining
With the Porosity/Inclusion Analysis Module for VGSTUDIO MAX, you can find defects in castings without having to use a saw and microscope. See which pores will be inside or outside the machined part and how they would be cut during machining by using the pre-machining tests. The Enhanced Porosity/Inclusion Analysis Module adheres to the rules P 202 and P 201 for examining the porosity of castings made of non-ferrous metals set by the VDG (German Association of Foundry Specialists).
The scanned cast part is widely used in the automotive industry. With VGSTUDIO MAX, pores were discovered that would be cut during machining.
The second picture shows an enhanced porosity/inclusion analysis according to VDG rules P 202 and P 201. The software automatically quantified the surface size of defects in CT slice images and also marked the defects in the 3D model.

VGSTUDIO MAX highlights what would be cut during machining in red
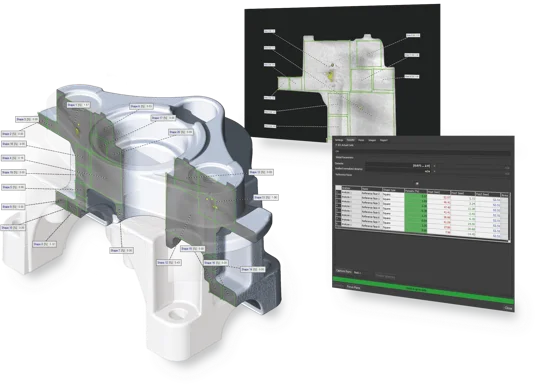
VGSTUDIO MAX automatically quantified the surface size of defects in CT slice images and marked the defects in the 3D model
Aerospace
Examine the Windings of a Coil
The Fiber Composite Material Analysis Module for VGSTUDIO MAX enables you to process both small- and large-scale volume data sets of fiber materials. In small-dimension material samples, VGSTUDIO MAX can show individual fibers. In large-scale volume data sets, larger structures such as fabrics or rovings can be analyzed and visualized.
In the example, the Fiber Composite Material Analysis Module in VGSTUDIO MAX was used to examine the coil of an aircraft engine type Lycoming IO-540-E1B5. The windings of the coil were color coded according to their direction, which made the winding technology that was used visible.

VGSTUDIO MAX color codes the windings of the coil according to their direction
Wall Thickness Analysis of an Aircraft Engine Cylinder
With the Wall Thickness Analysis Module for VGSTUDIO MAX, you can determine the wall thickness of objects made of various materials. It helps you to automatically localize areas with an insufficient or excessive wall thickness or gap width directly within the voxel, point cloud, mesh or CAD data set.
In this example, the Wall Thickness Analysis Module in VGSTUDIO MAX was used to examine the wall thickness of an aircraft engine type Lycoming IO-540-E1B5. We color coded parts of the data set according to their wall thickness.

VGSTUDIO MAX visualizes wall thickness directly on the data set of the aircraft engine
How to Non-Destructively Measure Hidden Components
With VGSTUDIO MAX, you can perform 2D and 3D measurement tasks directly on voxel data sets. All you need is the Coordinate Measurement Module. The possibilities go way beyond what can be accomplished when using conventional destructive or other non-destructive inspection methods.
In this example, the Coordinate Measurement Module in VGSTUDIO MAX was used to measure individual parts of an aircraft engine type Lycoming IO-540-E1B5. Thanks to industrial CT, we had access to the crankshaft, piston, and valves and could measure them without having to disassemble the engine.

VGSTUDIO MAX was used to measure an aircraft engine without having to disassemble it
Non-Destructively Inspect Rotor Blades Made of Fiber-Reinforced Plastic Composites
The Fiber Composite Material Analysis Module for VGSTUDIO MAX enables you to process both small- and large-scale volume data sets of fiber materials. In small-dimension material samples, VGSTUDIO MAX can show individual fibers. In large-scale volume data sets, larger structures such as fabrics or rovings can be analyzed and visualized.
In this example, the Fiber Composite Material Analysis Module in VGSTUDIO MAX was used to analyze helicopter rotor blades. The rotor blades are made of light-weight, fiber-reinforced plastic composites (GRP). VGSTUDIO MAX clearly shows the fiber orientation. Until industrial CT came along, the only way to inspect rotor blades was to destroy them. Industrial CT is able to drastically reduce costs since it is no longer necessary to destroy a large number of samples.

VGSTUDIO MAX clearly shows the fiber orientation within the rotor blades made of light-weight, fiber-reinforced plastic composites
Oil & Gas
Determining Fluid Permeability
The Transport Phenomena Module for VGSTUDIO MAX allows you to perform pore-scale simulations on data such as CT scans of soil samples, filters, or other porous or multi-component materials. Virtual flow and diffusion experiments are used to calculate homogenized material properties such as the absolute permeability, tortuosity, formation factor, molecular diffusivity, electrical resistivity, thermal conductivity or porosity.
In the example shown here, the Transport Phenomena Module was used to study the physical properties of a copper mining slag. A 3D representation of the sample was created based on a micro CT scan. Volume Graphics software was then used to simulate fluid permeability. The actual slag sample was left intact and unaltered.
Life Science
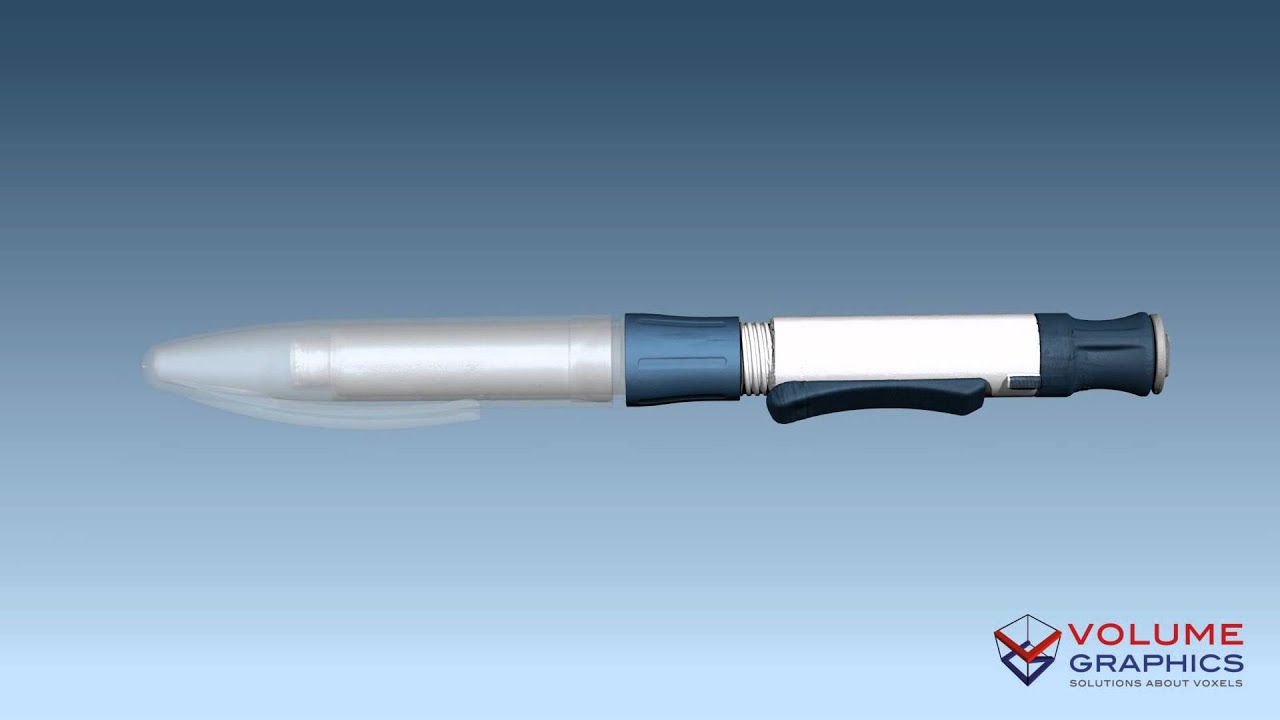
Non-Destructively Inspect 300 Features of an Insulin Pen
With VGSTUDIO MAX and the Coordinate Measurement Module, you can measure in 2D and 3D, even on the interior surfaces of an object. The software supports you with a complete range of measuring functionality, including geometric dimensioning and tolerancing (GD&T according to DIN EN ISO 1101). The possibilities go way beyond what can be accomplished when using conventional destructive or other non-destructive inspection methods.
In this example, a life science company used VGSTUDIO MAX to inspect an insulin pen. The operability and production quality of sample parts of the insulin pen were tested before going into serial production. Typical tolerances were ± 50 µm. More than 300 features were inspected per part. The entire insulin pen is not much bigger than a ball-point pen.
Determine the Wall Thickness of Film-Coated Tablets
The Wall Thickness Analysis Module for VGSTUDIO MAX determines the wall thickness of objects made of various materials. With this module, areas with an insufficient or excessive wall thickness can be automatically localized directly within the voxel data set or within point cloud, mesh or CAD data sets.
In this example, a customer examined the wall thickness of film-coated tablets with micro-encapsulation. The scan revealed the droplets inside the tablet that contain the actual drug. VGSTUDIO MAX was used to measure the wall thickness of the coating of the tablet and the coating of the droplets. Only if both wall thicknesses are within specifications can the drug work as intended.
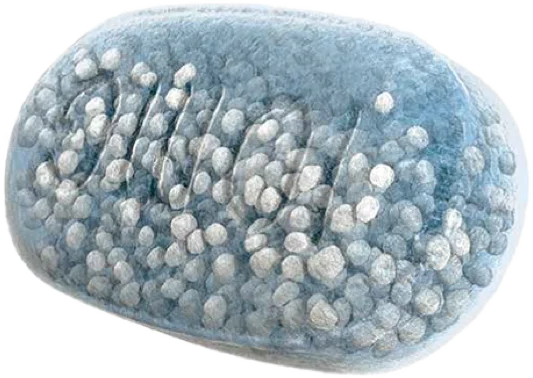

VGSTUDIO MAX was used to measure the wall thickness of the tablet and droplet coatings
Consumer Products
Unrolling a Bottle Cap
The non-planar view function in VGSTUDIO MAX “unrolls” objects, e.g., cylindrical objects and then scrolls into the object slice by slice. Not only does this work with cylindrical objects, but also with freeform surfaces.
In this example, a customer unrolled a bottle cap by using the non-planar view function. The image explains how the non-planar view function was used to find contact areas between the bottle and the cap. It would have been very difficult to inspect the relationship between bottle cap and thread with destructive or other non-destructive methods. With industrial CT, however, it was possible to determine the how leak-proof the cap was non-destructively.
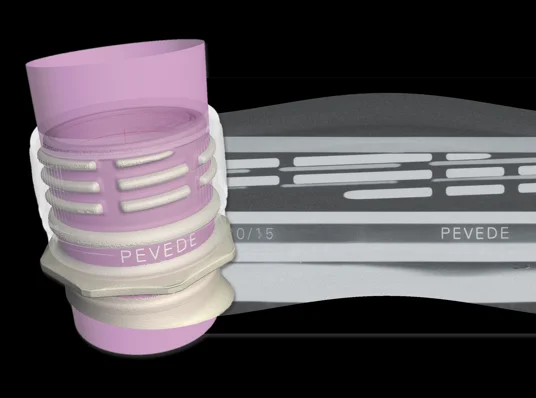
The non-planar view function was used to find contact areas between the bottle and the cap
Easily Inspect Conducting Paths Using Industrial CT
With the segmentation tools in VGSTUDIO MAX, you can non-destructively split a data set into its components. Afterwards, you can visualize identified details in the most descriptive way.
The Region Grower tool in VGSTUDIO MAX was used to identify details in this USB thumb drive, which was scanned as part of a joint research project between GE and the Technische Universität Dresden. Watch the video to see the conducting paths in a photorealistic rendering and a descriptive color-coded rendering. Also shown: measurements between the components of the USB thumb drive.
Non-Destructively Inspect Fiber Composite Materials
The Fiber Composite Material Analysis Module for VGSTUDIO MAX enables you to process both small- and large-scale volume data sets of fiber materials. In small-dimension material samples, VGSTUDIO MAX can show individual fibers. In large-scale volume data sets, larger structures such as fabrics or rovings can be analyzed and visualized.
A manufacturer of carbon fiber parts for bicycles used VGSTUDIO MAX and the Fiber Material Analysis Module to non-destructively inspect its forks. While forks are always a weak point on a bike, forks made of carbon fiber require particularly thorough inspection. On the one hand, carbon fiber parts are light, strong, and stiff. On the other hand, they have a very low elongation at break. In VGSTUDIO MAX, possible weak points can be identified before shipping – and without destroying the fork.
Make Bent Circuits Visible at a Glance
The non-planar view function in VGSTUDIO MAX not only “unrolls” a cylindrical object, it also allows you to cut through the object following a user-defined path. Clipping features then allow you cut the visualized object open for an inside-look. All of this works totally non-destructively.
The example of the “classic” mobile phone shows how useful the non-planar view and clipping functions are.
The pictures illustrate the non-planar view function. In the left picture, the regular slice view only partially reveals the circuit. In the right picture, the non-planar view shows the complete circuit. A line indicates the path of the non-planar slice. This path follows the circuits in the mobile phone.
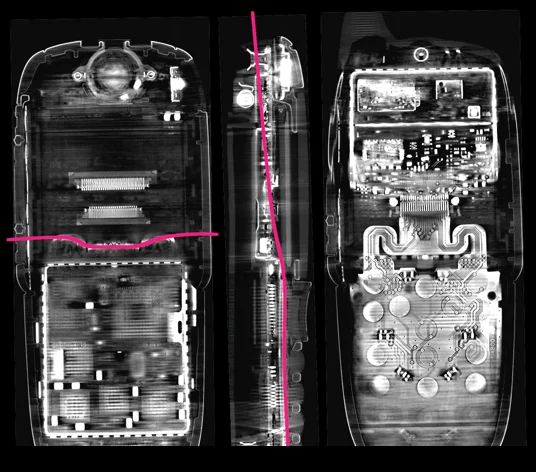
Example for the use of non-planar view. Left to right: regular slice view, a line reflecting the path of the non-planar slice, non-planar view
Special Requirements?
Special Requirements?
Should your requirements exceed the functionality of our standard products, we look forward to receiving your request by e-mail at support@volumegraphics.com.


